
32. A design process
+ a bit of self-promo
This might be too long for an email, so make sure to read this post on the website or in the app to not miss anything!
Hello everyone! Summer goes on and keeps being unbearably hot. In unrelated news, I’ve finally created a design account on Instagram, mostly to try and find clients outside the TTRPG niche (I love that niche but as a freelancer it’s risky to only have this one to rely on). I’ve long been reluctant to do this for many reasons. Firstly because I can do without all that validation regarding my work (a “nice” from my fiancée is all I need really), but also mostly because of Meta’s politics and their use of AI, and the reliance on privately-owned platforms.1 But like I said I’m a freelancer and my income heavily relies on my visibility, so I’m giving it a go. Check it out and I’ll try to make it fun (promise).
Also, if you’re working on a book for Mothership Month 2025 (happening in October) but still need a graphic designer to help you with layout, look no further! I have worked on several Mothership supplements such as Hoss and Astral Brews as well as the upcoming Outer Rim Uprising and Twisting Unseen, so I know a thing or two about that blue collar space horror game. Get in touch!
Fresh off the grid
I just released my submission for the Appx. N Jam: Apparitions in the Mirror Maze. It’s pay-what-you-want so no excuse to not at least check it out. I had a lot of fun putting this together so for this month I want to write about the process. Hopefully you’ll learn a thing or two.
Process: layout
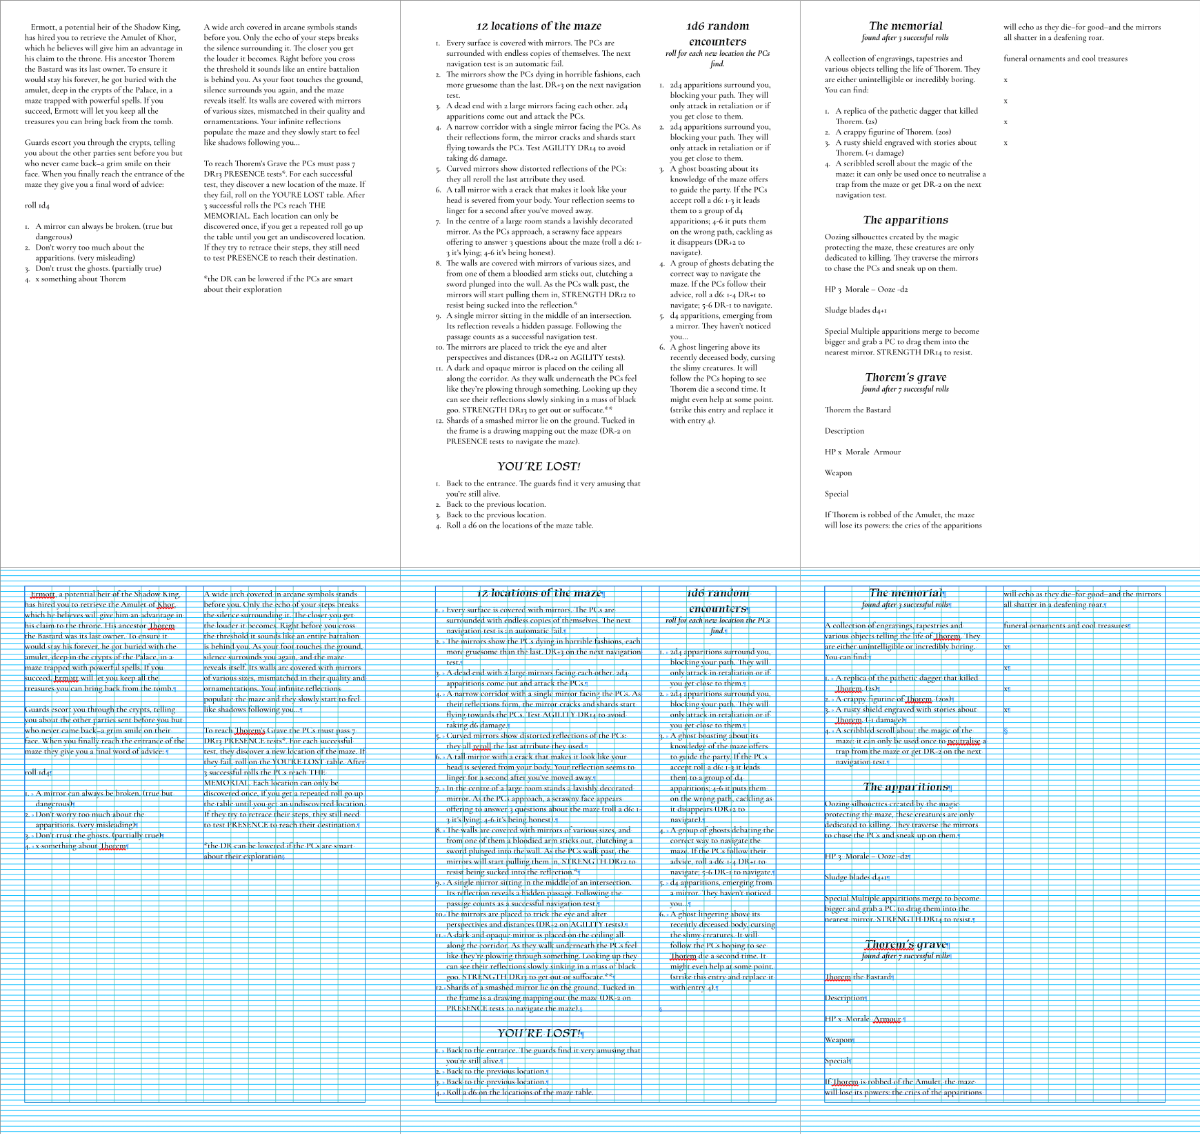
First off, the jam’s limitations: an adventure in the style of old fantasy books fitting on 4 A5 pages. Like many other participants I wanted to make a cool cover, so I’m down to 3 pages of text. It’s getting tight. So once I have most of my manuscript written, it’s time to start with layout. After picking some fonts (Cormorant Infant for the body and Tapestry for the headers), I need to set up my grid.
As you can see below, I went for 8 columns to have some flexibility and accomodate columns with different widths. I’m using a baseline despite this being for MÖRK BORG, but space is limited and I know I have a lot of text so I’ll need this structure to organise the text clearly. Then I built all the styles I needed: main body, numbered lists and headers. At this point, I have a good idea of how much text can fit on the pages, how much needs to be trimmed and where I could fit in some illustrations.
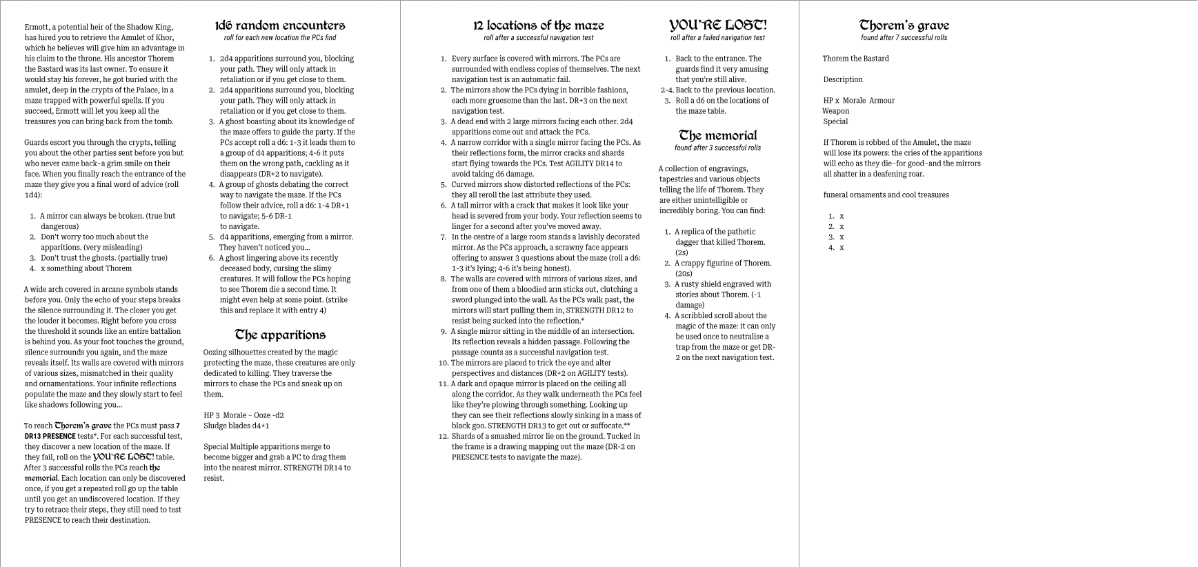
Next step was giving this more flair, as it all looks a bit bland. Plus this is written for MÖRK BORG so it needs something a bit more elaborated. First a change of typefaces: now I’m using CAT_Walthari for the headers and Roboto Serif Extra Condensed for the body. Tapestry was too refined and Cormorant Infant too classic. I also edited and reorganised the text to make it flow better. The first page now has all the background info (plot, hooks, procedure), the random encounters and the monster statblock; the second page has all the random tables for locations players will discover; and the third page focuses on the boss fight. That way the DM has all the information relevant to the exploration on one spread, and the final stage of the dungeon is given more importance by having its own page despite not taking that much space.
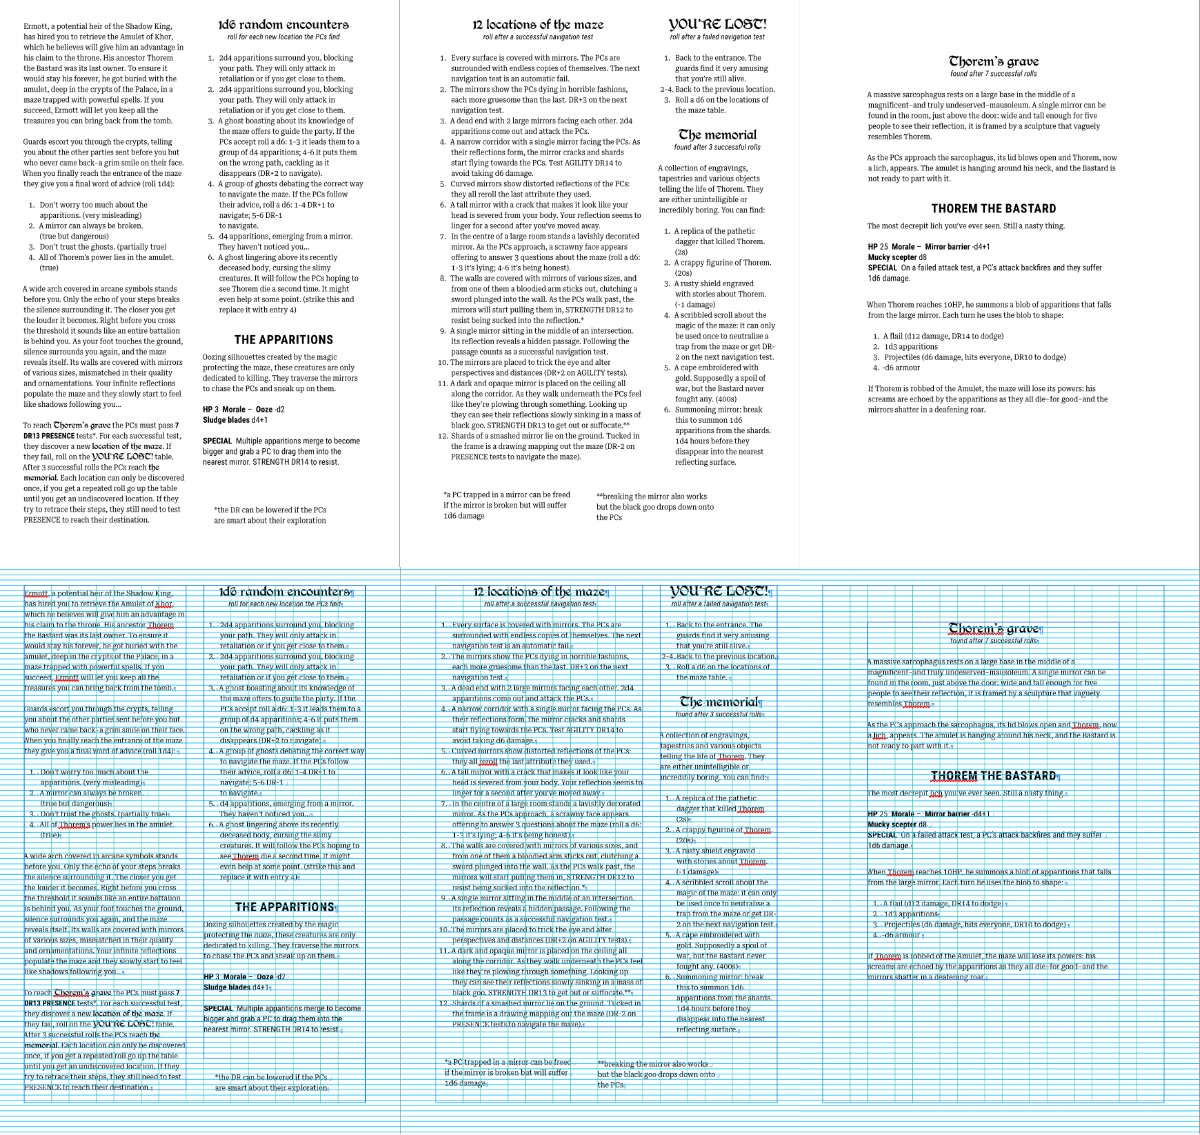
Now that the layout is more clearly defined and the text is finalised I can go back to giving this some MÖRK BORG flair. Inspired by the introductory adventure Rotblack Sludge, I set the stablocks in a sans serif typeface, Roboto Condensed (which also pairs naturally with Roboto Serif). As you can see, the last page now makes more sense as the text is wider and sits in the centre of the page.
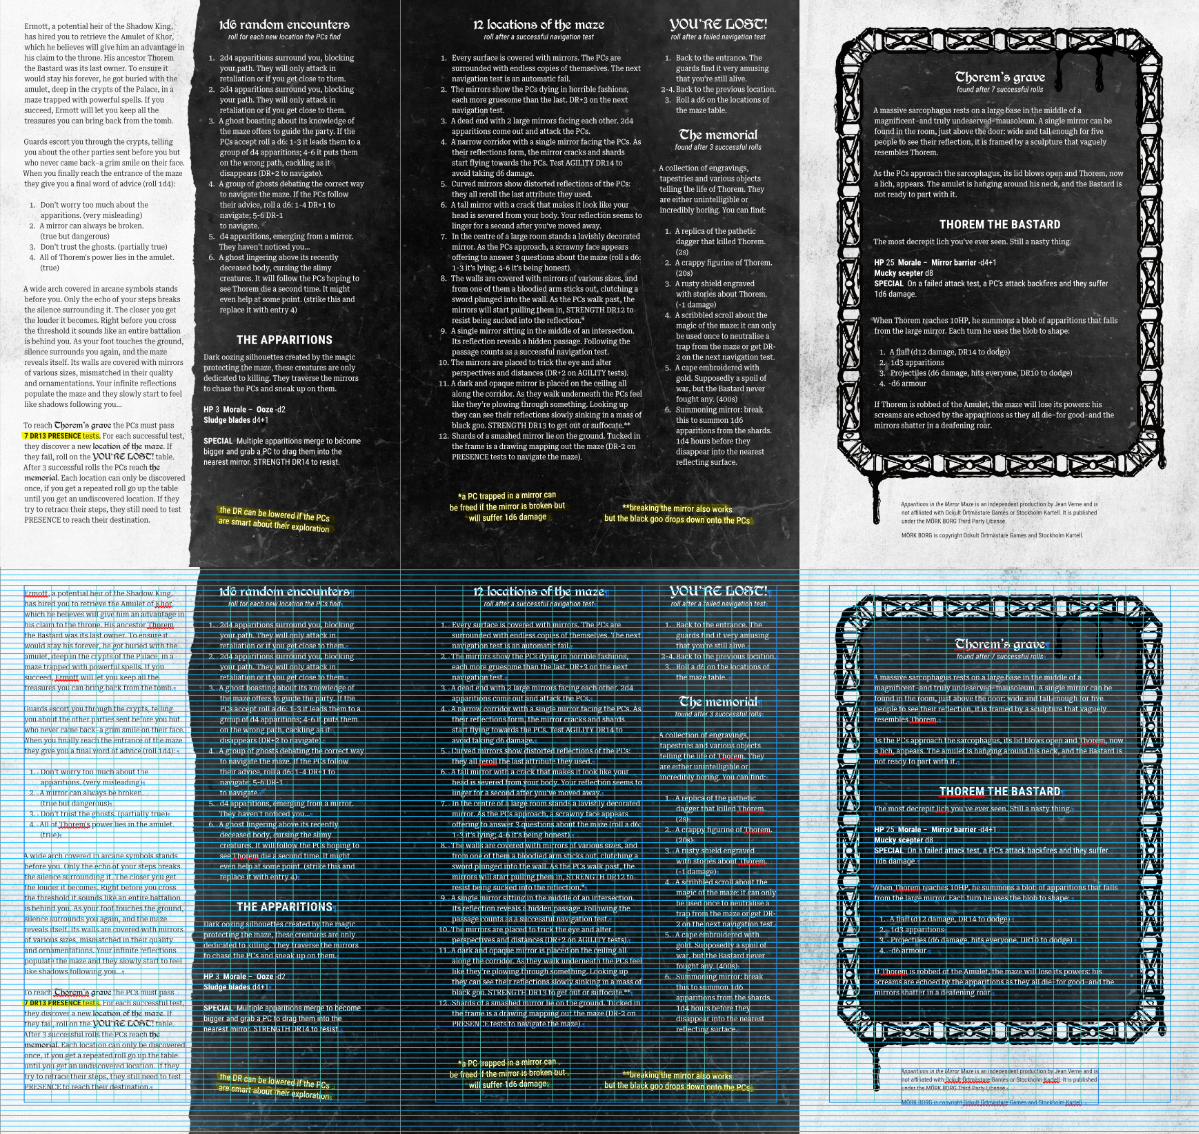
Finally I can add all the thematic visual elements. For the central spread, I wanted to emphasise the separation between the background info and everything related to the maze. I used a grungy texture with an invert filter and some level adjustments for the white part on the left, and masked it with a torn paper texture. For the black background I wanted to evoke the mirrors found in the maze, so I used a glass texture (black and white filter + levels adjustment) with this dirty glass texture set to screen mode with 30% opacity. Naturally the text with the black background is set to white. The yellow highlights are made with one of the default markers brush from Affinity Designer (can’t remember which one, my bad). For the last page at first I wanted to recreate a bit of decor I mention in a description, where a large mirror is framed by a sculpture of the final boss, but that was too ambitious for the amount of time I had, so I settled for a gross mirror instead. The background and the glass are the same textures as the spread, I just moved them around a bit. For the frame itself I used this brush pack. And for the goo dripping from the frame, I used this blood texture, put a threshold filter on it and then distorted it with the transform option (couldn’t be bothered to use liquify) and masked the parts I didn’t need.
And voilà, that’s the layout done! Now onto the cover.
Process: cover
I don’t have much to say about the ideation process here, as I was thinking about the cover while doing the layout so the few notes I took were mostly to make sense of these disorganised thoughts.
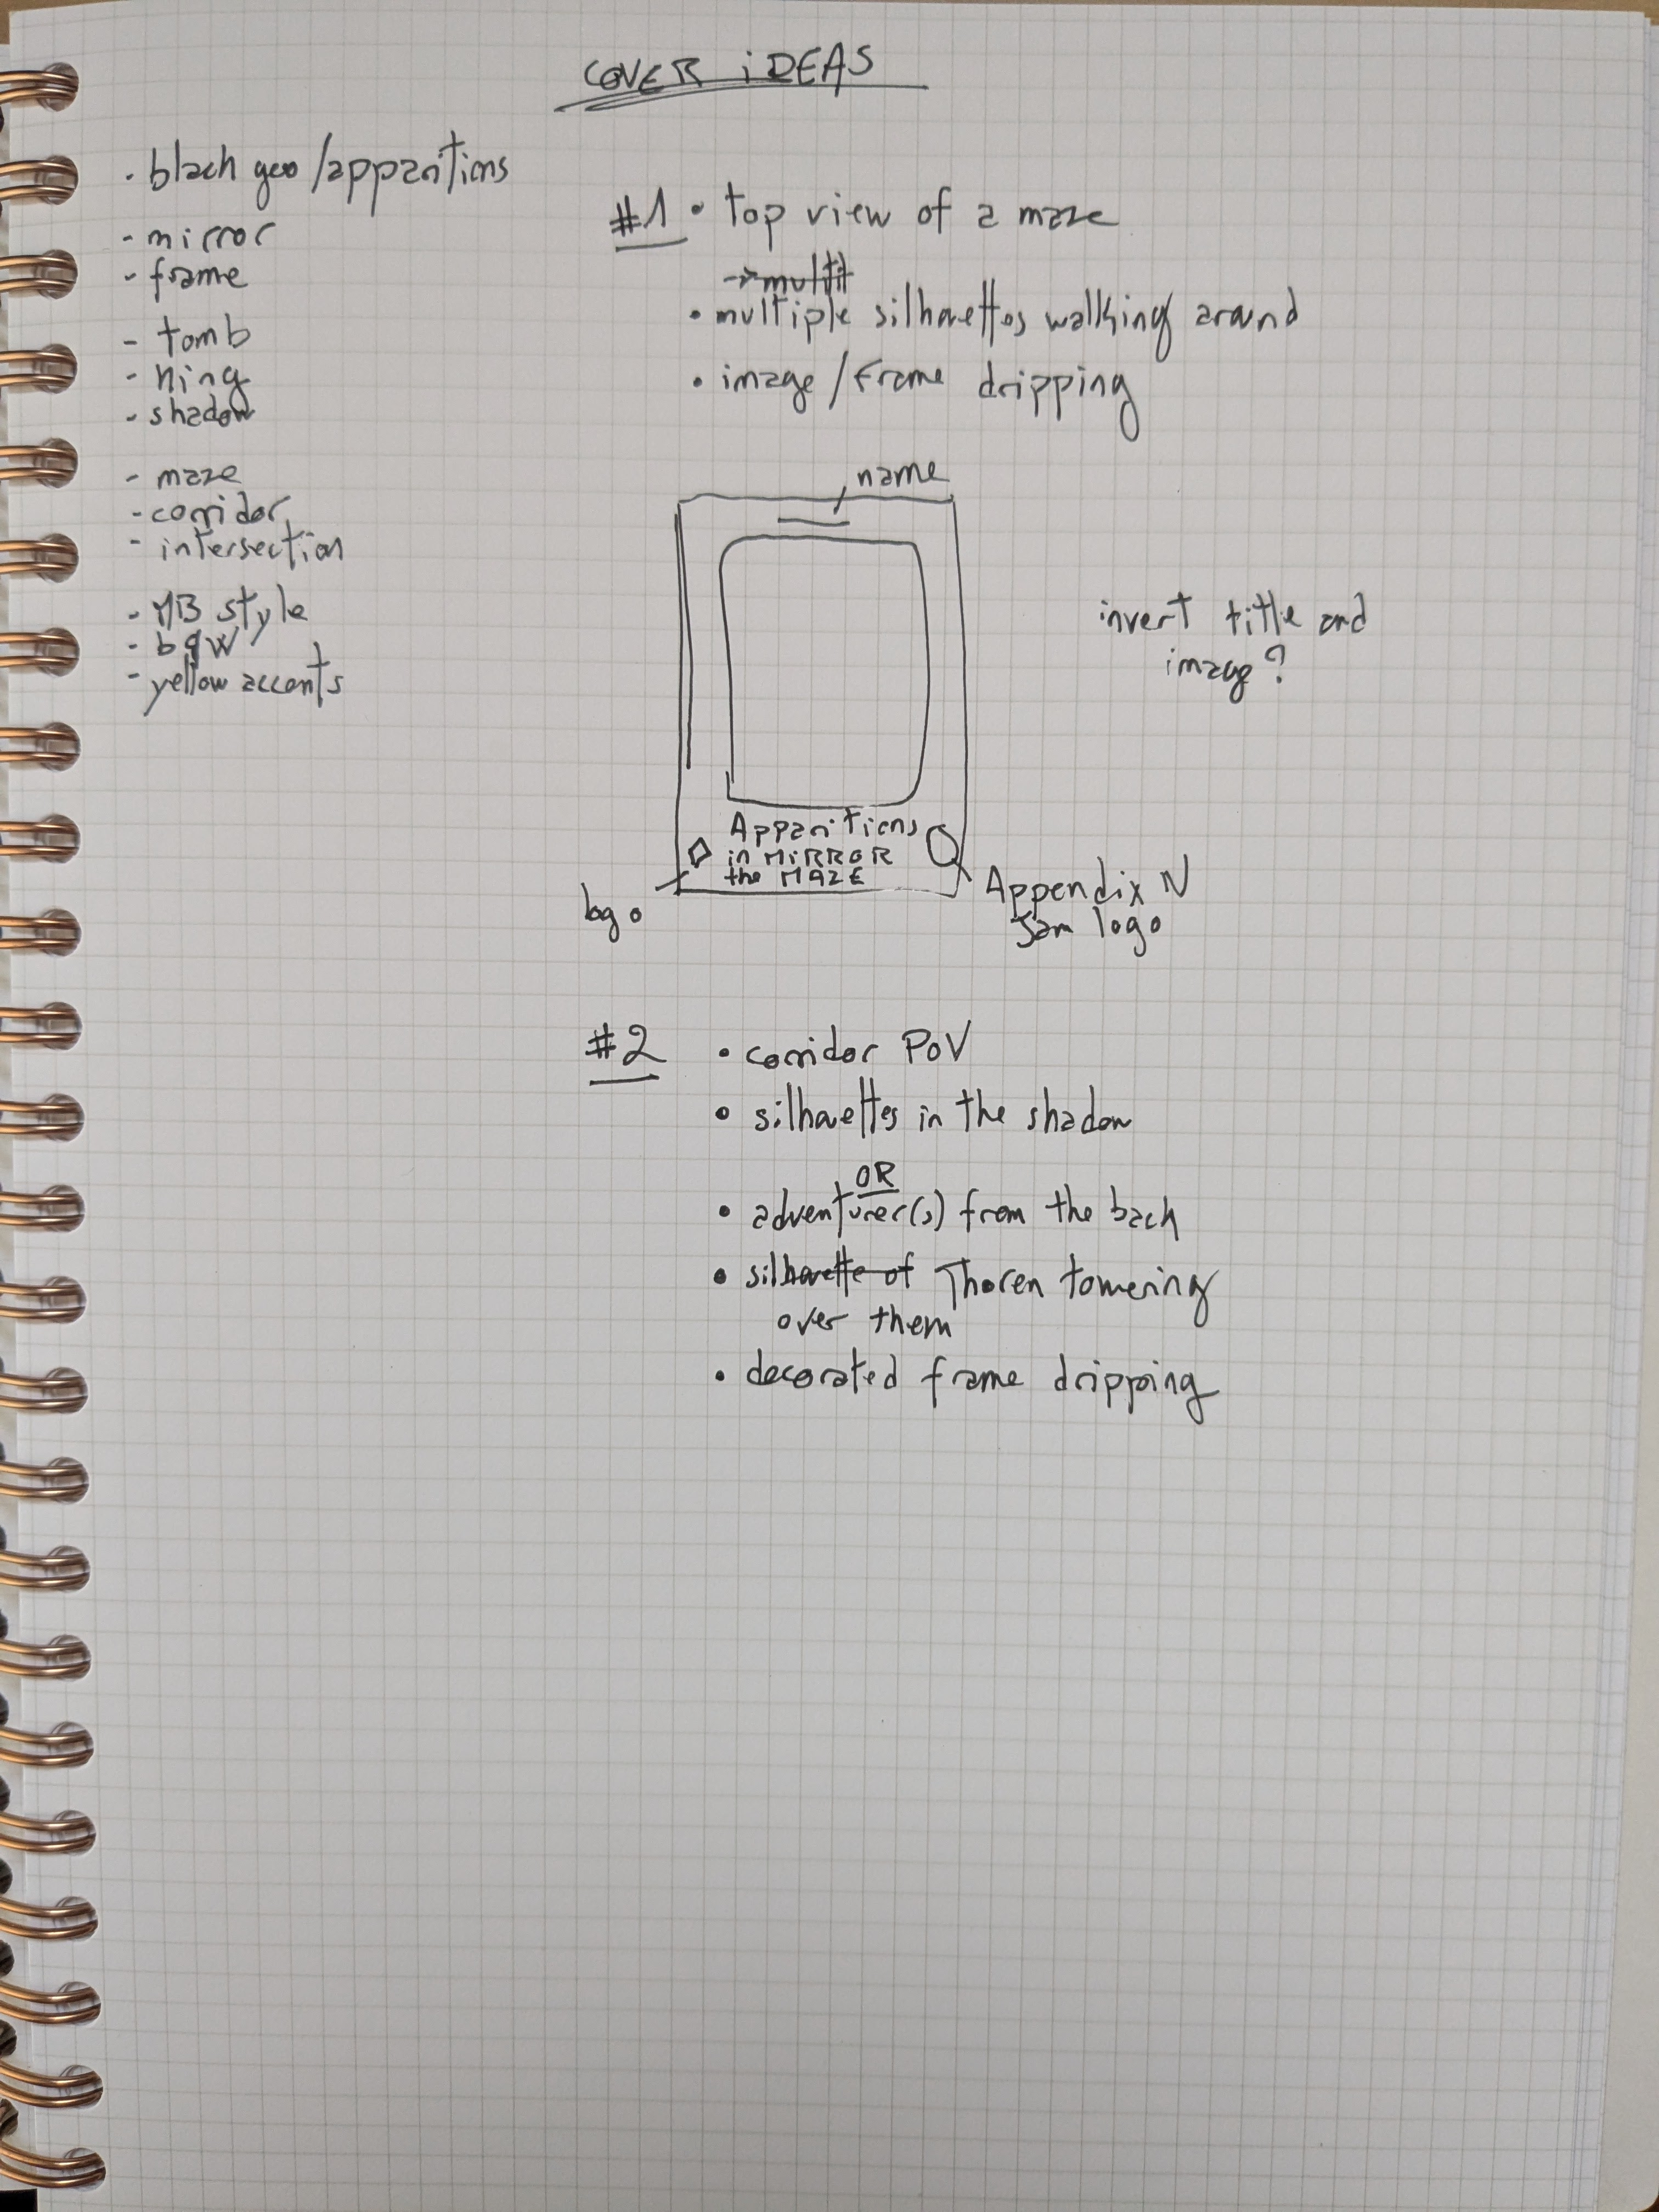
I first drafted a concept to place the various elements of the cover and find the title font. I landed on Hellmade from the always great Brandon Nickerson. A few other options I considered were Alphabyte also from Nickerson (I found it too round for a MÖRK BORG module) and Temple of Sorrow from Kern Club (too hard to read for a retro book cover).

I can’t draw so I rely heavily on public domain photography and art for my work. I had done some research to see what images I could find that would fit the theme, and the two that seemed the most promising were this top view of a maze and this “infinite” corridor. Based on my notes I did a few tests with the top view, I tried to insert some knights’ silhouettes but I knew the perspective would be a nightmare so I quickly switched to the corridor. I found this cool picture of a dude with an axe and cut out his silhouette to paste it into the corridor.
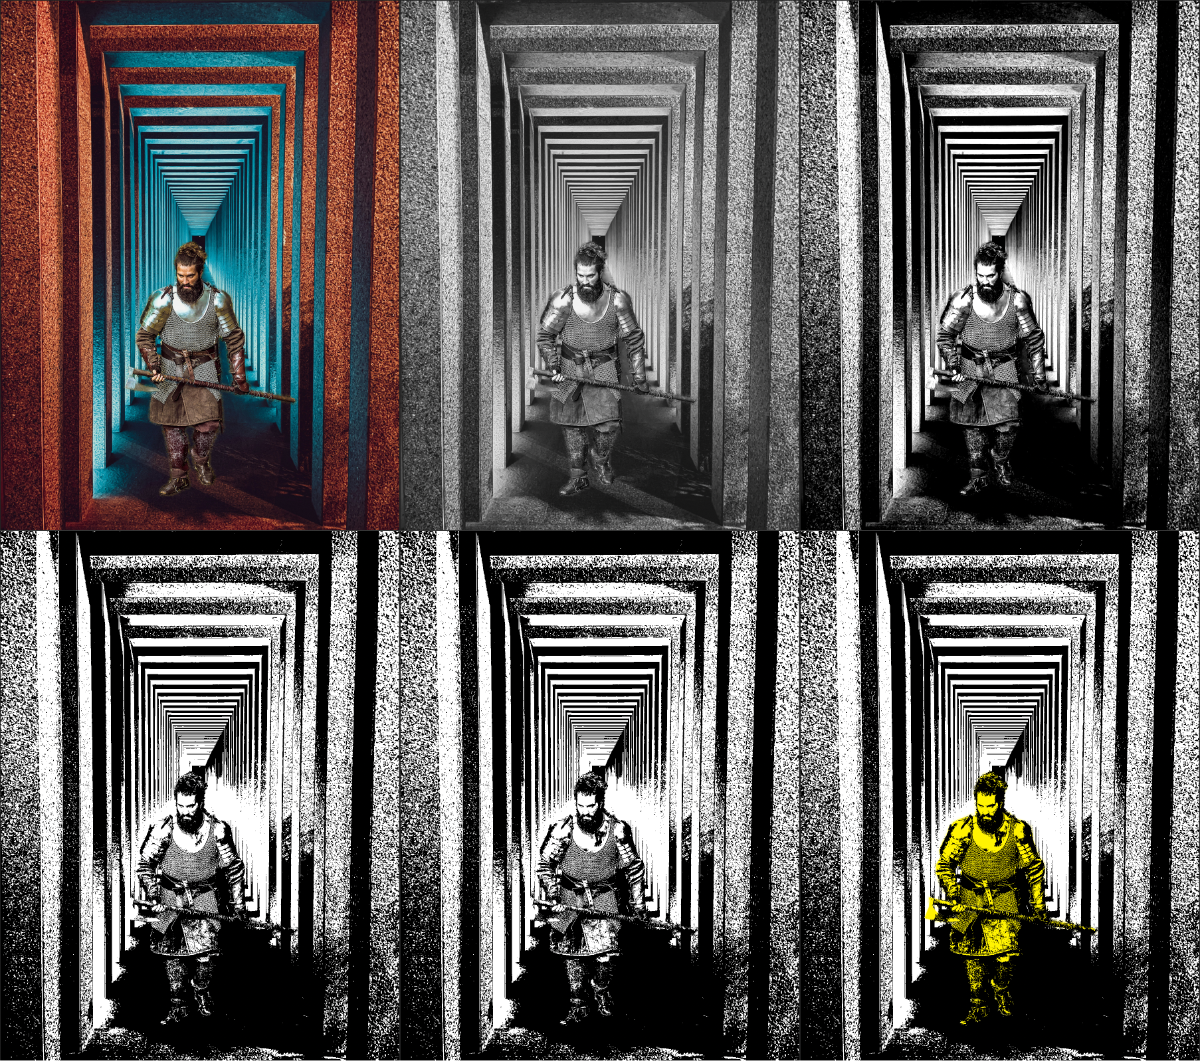
The process in the image above goes as follows (left to right, top to bottom):
Character is positioned on background.
Black and white filter to see the values more easily.
Levels adjustment to increase contrast.
Threshold filter to give every element a stark black and white contrast.
Levels and shadows/highlights adjustment to add details on the character.
Layer fill set to darken masked to the character to make it stand out.
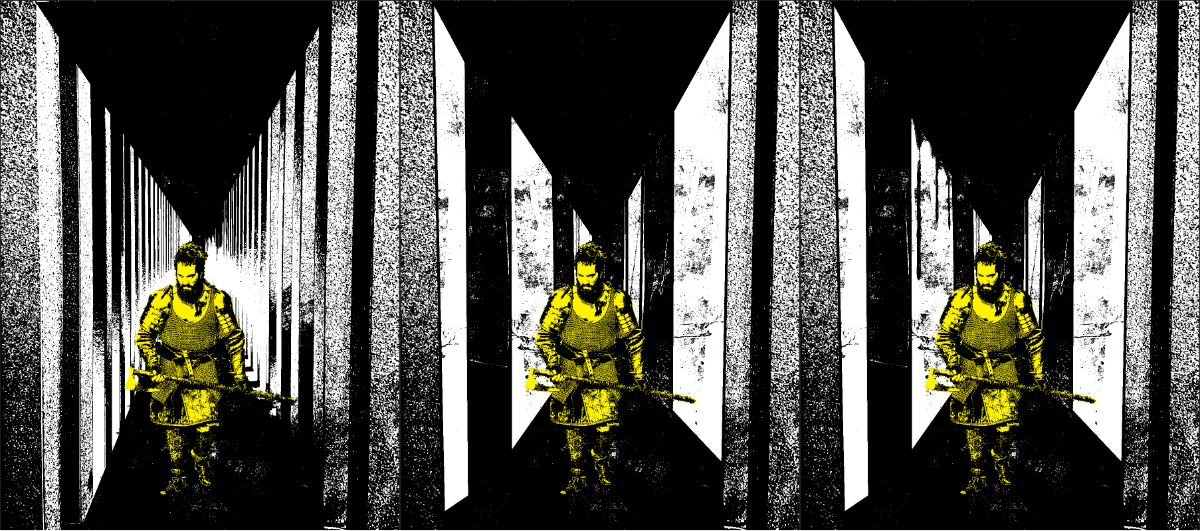
Then I needed to rework the background. It had too much detail and didn’t look enough like a maze filled with mirrors. To do this I simply drew black and white shapes to simplify the ceiling and ground, and create walls and openings around the character. Each shape is filled with the same grungy texture with a levels adjustment and an invert filter for the white shapes. The final touch was adding some goo dripping from a mirror with the same blood texture as on the mirror frame.
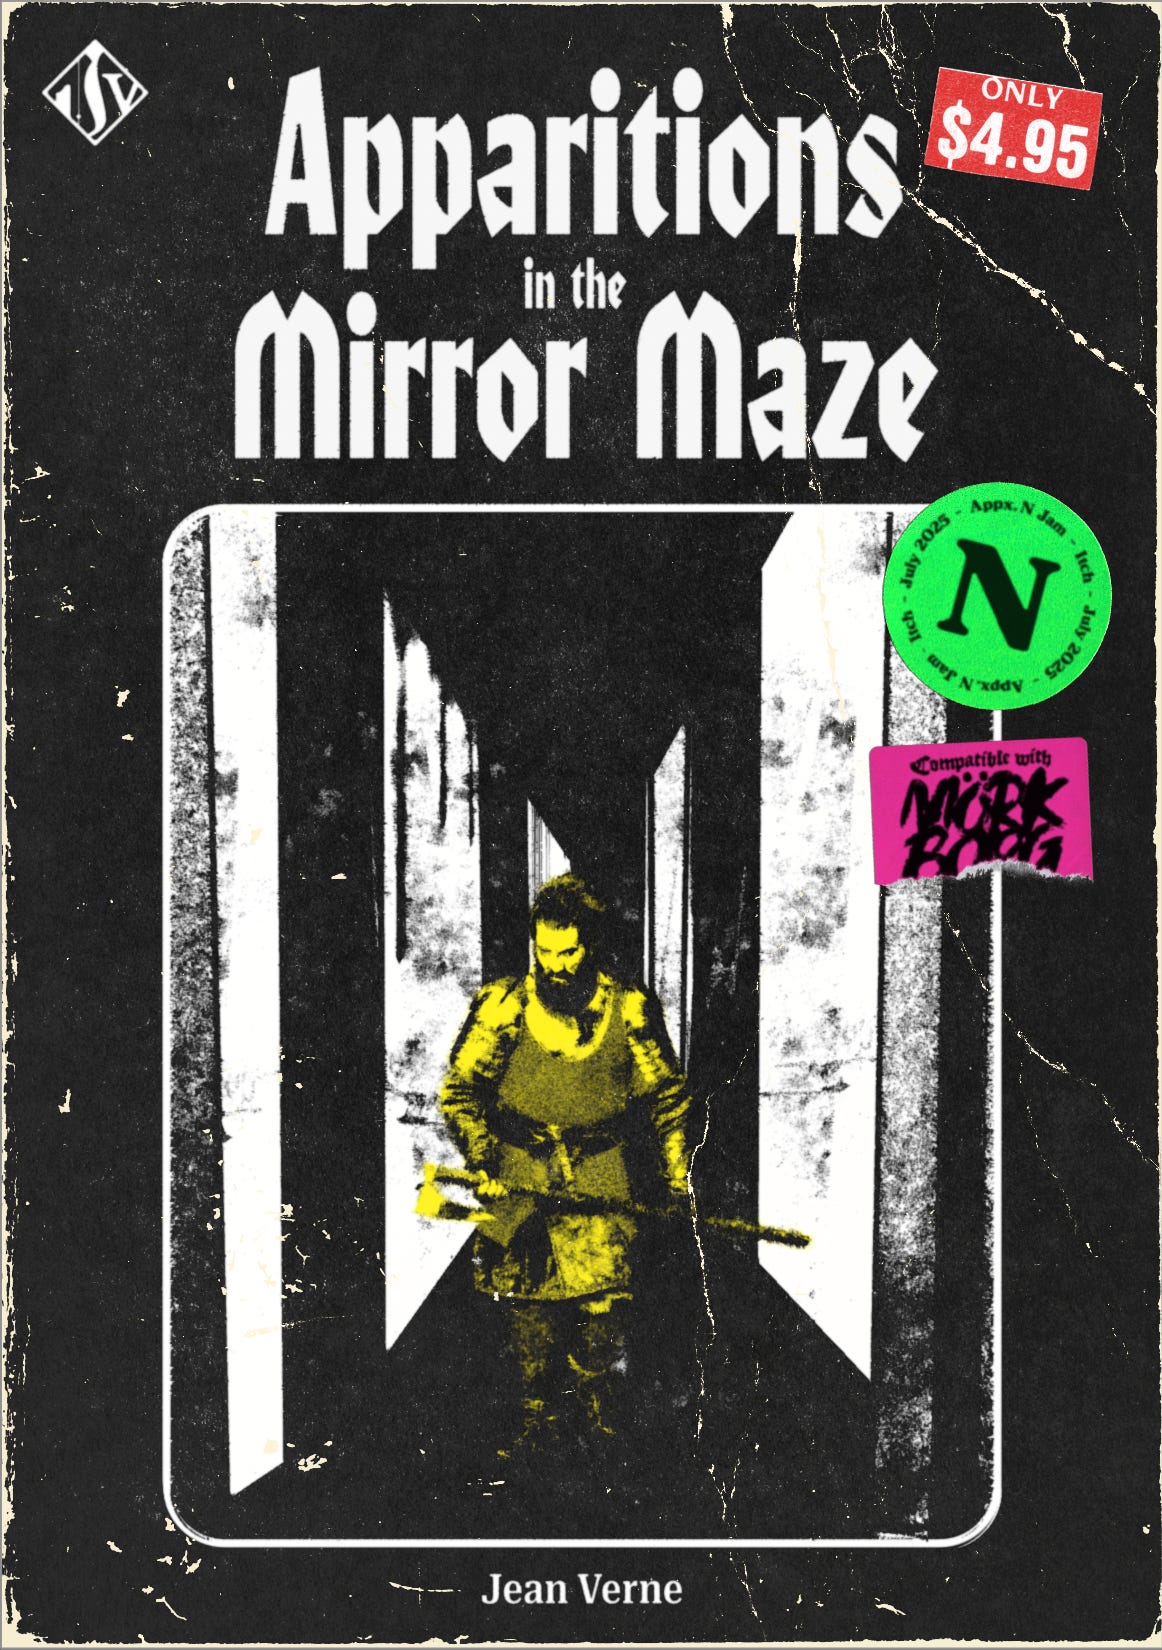
After that I popped the illustration in my cover design and shifted things around for a while. I particularly struggled with the placement of the illustration in the frame because I had “drawn” it in a completely different ratio. Then I slapped on a paper texture for the worn-out look (blending mode to lighten, 80% opacity). For the creases I followed Lone Archivist’s tip and used two different textures: the one everybody used and another one. Finally some stickers for some good old skeuomorphism, the green and pink ones are from this pack, the “4.95” from this one.
That’s it, phew! If you made it this far, thanks for reading, I hope that was helpful. Don’t forget to check out the actual adventure!
What’s your type(face)?
I’m skipping the typeface selection this time!
Creative fuel
Carly Ayes wrote about how fast and slow are both valuable pace for creatives, especially with AI becoming more and more prominent in creative fields.
I watched the French film “Le Samouraï” by Jean-Pierre Melleville and absolutely loved it so I made a couple of posters. The first one is the stronger concept and my favourite, but the second one makes more marketing sense in showing Alain Delon’s face (which back then you definitely wouldn’t hide).


The Alphabet Superset continues: Silent Alarm by Bloc Party, To Lose My Life by White Lies and The Universe Smiles Upon You by Khruangbin. A very “indie UK rock from the early 2010s” selection and some groovy psychedelia.


That’s it for this month, thanks for reading!